Monday, April 28, 2008

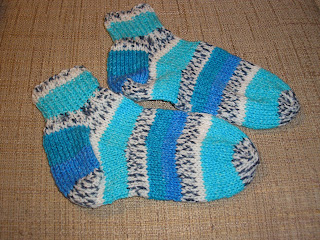
Yep, you guessed it.....


More socks! lol Lovely yarn, btw. I'd love to buy more (for a sweater!) but it was a bit pricey. Pagewood Farms, Yukon, color name is Crayon. I bought it at Kirkwood Knittery, or whatever the shop is called. Anyway, I did this pair on two circs, size 1's.

Wednesday, March 19, 2008

More socks!

I finished the blue and purple Magic Stripes socks last night-they are for MEEEEE!!!!!

Same basic pattern-2x2 rib for 4 inches, then stockinette for an inch, short row heel, foot for 5", then toe, then BAM we have sox!!!


I also finished Ned's socks the other day. He wears about a size 10 shoe. I barely had about 10 yards of yarn left. I'd used Jawoll green/brown/blue stripes, CO 72 on 0's. Nice yarn, but next time I think I'll make his a bit shorter. I was sweating it out toward the end there. :D You'll notice the toes are different. I'd unspun a bit in between socks to make them match and that was the left over. Close enough for toes, right? ;)
Color is a lot darker/brighter in person. Now he says he's a professional model since his legs are on the net. lol


Monday, February 25, 2008

Magic Stripes socks and the duckie DPN holders

Hey, I like this yarn! LOL I know there are some yarn snobs out there that will never entertain the idea of using it. I've used this for some fingerless mitts, and it's soft, wears really well, washes and dries really well, and IMHO, gets softer with each wearing/washing.

I'm using one skein per sock, since I have plenty of it, and wanted the stripes to match. I CO 64 and am using 0's. It's a basic sock pattern, 2x2 rib for the cuff, then stockinette for about 1 1/4", then SR heel, then stockinette for the foot. I'll most likely do the toe the same way I did the Austermanns.

A word about my DPN point protectors/holders you see here and in other posts........aren't these the absolutely most adorable thing you've seen in like......I dunno.....forever? LOL Seriously, when I saw them here: http://veganknitter.blogspot.com/2007/09/dpn-project-holder-tutorial.html I just had to make some for myself. I ran right out to Hancock's for some elastic cord (the ditz at jackman's had absolutely NO clue what I was on about....), then bought some of the pencil toppers. You can search for your best deal on these. The regular tan rubber ducks are too big, IMHO. The pencil topper holes are the same size, but the ducks themselves are about 3-4 times bigger than the devil ducks and pirate ducks.

So allow me once more to thank Vegan Knitter for sharing this great idea on her blog. Thank you, Vegan Knitter!!! :D

Online socks

I haven't made much headway on these, and I don't really know why. I think this is very pretty yarn, and it's working up nicely. I CO 70 on 0's and am doing a 3x2 rib on the cuff. Then I'll just a SR heel and stockinette foot. It's Online Supersocke Melange, 974. I bought this yarn at Loopy Ewe in Chicago when I was there for the Genesis concerts in October 2007. I stayed at the downtown Travelodge with Jennifer and her mom, and this shop was about 2 blocks away. For more details on the Genesis shows, see http://ssudio.livejournal.com/.

I also bought some clear clogs at that shop. It was nice to be able to try them on. Ummm, nope, I haven't actually worn them outside the house yet! lol


Ned's socks

Ned wanted some socks, so this is what I've done on his so far. I'm ready to start doing the heel, so I suppose I'm ready to try to figure out how to use that reinforcing thread that came with this yarn. I've never used this before, and nobody can seem to tell me exactly how and where to start using it. LOL So I'll muddle along and hope it works out.

If you can't see the label on this yarn, it's Lang Jawoll color. It seems a bit thinner than the Austermann, so I've gone down to 0's for this and CO 72 st.

Austermann step socks

This is the first time I've used this yarn and I have to say, I really like it. It has aloe vera embedded in the fiber and it's really nice to work with. Nice and easy on the hands. And it works up nicely, too. I just did a regular 2x2 rib for the cuff, then stockinette for the foot. I CO 64 stitches and used 1's and short row heel. I am doing the toes a bit differently than what I've seen in patterns. When I've done most of the foot, I start my decreases normally....every other round. After I get to about 1/2 the stitches on each needle (8 each in this case), I start dec every round. Then I'm left with 4 st on each two needles, and do the Kitchener/graft stitch at that time. The toes end up looking nicer, IMHO, and they don't have those annoying square "ears" like most socks do.

The first shot looks very washed out, and the second is too yellowish. Flash/no flash.


I've since started another pair in the red/black/grey colorway, and am almost done with those. I made them about 2 inches longer.

Even more fingerless mitts!

Yep, you guessed it......

First pair are made from Regia Stretch. When I first started knitting this up, I was very disappointed in that it seemed that the yarn plies were separating from the elastic ply. I was assured they would "bloom" after washing. It took a couple of machine washings and dryings to make them do that to my satisfaction. I'd use this yarn again for socks. I think I used a size 1 for these and I might be happier with 0's for socks.


These are some more of that gorgeous yarn I talked about in November. Yummmy stuff!

These blue/green numbers are Sockotta 6 ply. I bought this at my fave LYS, Heathstone, and I think it was the last skein of it. I sort of had to jigger a bit to get them to match, but they turned out kind of neat, IMHO. I usually wear them over some navy/colonial blue magic stretch gloves, and I feel quite stylish. LOL I used 2's and it's just a 2x2 rib all the way.

Scarf update

My son volunteered me to do scarves for a few select friends of his. I had made him a Cornell scarf-purple and white-for Christmas last year, and several of his friends admired it and wanted one. The kids picked out their colors, and Nathan and I shopped for yarn. I finally finished them so he could take them back to college after Christmas. I was surprised and pleased to get thankyous from nearly all of the kids. I enjoyed making them-very simple pattern, and something that I could do while watching tv-and I think they turned out pretty nice! Here are some of the results. Thanks to Nathan for the pics!


Thursday, November 15, 2007

More fingerless mitts!

Yeah, I'm loving these! My hands are cold and I don't like wearing regular gloves when I knit or type on the computer. (well duh, that's why people do these, right?) So I made another pair. (and in a day or two, you'll see yet another pair from Regia Stretch.....another story)


I used the same pattern I used for the Magic Stripes pair from a previous post. But this time I made them a bit smaller. I CO 56 and decreased to 42 after the ribbing. There is plenty for a pair of socks. I don't think I used 1/2 the ball for the mitts. Wondering now if I can get a hat out of the rest of that ball. I guess I'll try measuring it somehow......in my spare time. lol


I love the yarn and I have another ball of it in a different colorway. It's so soft that I kind of thought it might not be a good one for socks. It's hand painted fine merino socks from Lanartus in the turquiose/fuscia/blue/purple/pink/lavender colorway. The next set will be from the same yarn in the variegated blues. And I think I will do the thumb a bit differently. I like the rolled edge, but maybe I'll do one w/o that next time. Maybe a couple of ribbing rounds before the bindoff. They look like they are a bit different in size, but I think it's because one of them was tried on more.


Ooooh I love this yarn! And if it weren't so expensive, I'd be tempted to do a sweater from it.
Did I mention I love this yarn?

Friday, November 02, 2007

Super Easy Fingerless Mitts

Well looks like I haven't been here for some time, but I've been busy. :P I've been working on a lace sampler scarf for a class at my LYS, and it's quite time consuming. We are using Alpaca with a Twist Fino, which is very fine-both ways! Beautiful yarn and very very thin. The yarn is here: http://www.alpacawithatwist.com/index.htm

I don't see the book on the website, perhaps it is only published for class use. But the pattern is here, about 2/3 of the way down the page. http://www.aurora-alpacas.com/2007catalog.pdf

But anyway, the point of my post is that I have finished something-just last night in fact! I've had this thing for fingerless gloves/mitts and usually just whack off the fingers of those cheapo magic gloves that you can buy for a buck. But I decided I was worth more than a buck and since I have this massive amount of sock yarn, thought I'd give some a try.

There were plenty of free patterns on the web, so I tried one that I found on one of those free pattern sites. Well, it was a disaster and I ended up starting over. I used the same yarn, same needles, same gauge and obviously the pattern writer has yooooooge hands! Here's what I finally came up with.

I'm only typing this up here because I had to redo one. LOL I'd bet money the exact same thing is online *somewhere,* just nowhere I could find.

Me wearing 'em and one sitting for its portrait. Ain't they purdy? :D


I used Lion Brand Magic Stripes, I think it's called Spring, but I've been calling it Clown. :P I've had this Magic Stripes stuff forever, and knew I'd probably not use this colorway in socks.

Using size 1.5 (2.5 mm) DPN, cast on 64 stitches. You can use a straight needle and then transfer to your DPNs if you like. You'll find this will be a bit looser than your normal sock gauge. I figured it didn't matter too much because you won't be wearing them in shoes, and they most likely won't wear out as quickly.

Place a marker at the beginning of the round. Do 2x2 (K 2, P2, etc) ribbing for 3 inches. (this will look really huge, but I like a thicker wrist and anyway, I'd already done the cast on for the previous pattern, I didn't want to rip it out. lol) Having a number divisible by 4 will allow you to decrease one stitch on every knit rib. You will end up with 48 stitches and an interesting "design feature" at the end of the ribbing. If you don't want this design feature, then simply cast on 48 and forget the decreases. Next pair I make I will probably make them a bit smaller, maybe cast on 56 and decrease from there to 42. Eh-maybe somewhere in between. I'll have to do the math when I'm fresh. lol

Knit in the round for about an inch, 8-10 rows, then you will start the shaping for your thumb gusset. This is pretty standard, but I'll review that here: knit to within three stitches of your marker, place another marker, increase (I used K in front, then in back of the same stitch), knit one, then increase again. You will have three stitches in between your markers. Knit the next two rounds, then do your increase round again. You will do these three rounds/rows until you have 21 stitches in between your markers. (Note to self-for next pair, stop at 19.) Your next round will complete that row, then you will stop and place the remaining 21 (or 19) stitches on a holder of some sort-dental floss works really well. It's sturdy enough to hold the stitches, but flexible enough to stay out of your way.

Cast on 5-6 stitches on the end of your working needle, join that round, then continue knitting in the round for about an inch. You'll skip the thumb stitches, btw. When you have the length you like, bind off. The original pattern called for knitting every round and then binding off. This will make it roll. I didn't really want that, so I knit for an inch, then repeated my K2, P2 ribbing for an inch, then bound off in pattern.

Thumb was a bit tricky for me. I think because it is such a small space/tube to knit. I picked up the 5-6 stitches from where I cast on the extras, then joined with the gusset stitches on the holder. I decreased at the join until I had 18 (next time I'll stop at 20) stitches, then knit until the length I wanted. I didn't care if this rolled, I can roll it up or down, depending on my mood and level of chill. Then bind off.

If you're using two balls like I did, you can simply start each mitt at the same point in the color pattern. If you're not using two balls, then you could wind off enough yarn at the end of your finger area bind off until you hit that pattern again, and use that wound off yarn for your thumb. Or do both thumbs at the very end so you'll be able to match them, if you want.

Obviously (well that's obvious to some, probably not to me until I did one! lol) you can keep knitting the thumb, then finish like you'd finish the top of a hat-decrease until you have left a few stitches on the needle, then draw your yarn through and close the ends. You can also finish the top of the mitten, by knitting continously until the length you want, then starting your decreases like you would for a toe. Separate your stitches on 4 needles, you will do decreases on every other row. One side you'll do a K2tog decrease, the other side you'll do a slip, knit one, slip knitted stitch over for your decrease. You'll want your decreases to slant in the opposite direction. It won't matter for utility of course, just for "looks." Oh yeah, weave in your ends! ;)

Any questions, just email me-I'm no expert by any means, but will help any way I can.

Enjoy!

Sunday, October 28, 2007

More Jiffy Socks!

These are just like the blue ones in a previous post. More "big fuzzy sleep socks" for Christmas. These really do work up quickly, I think I finished this pair in an evening. It's odd how one "pooled" more than the other in some places. I like the way the diagonal stripes ended up on the leg. Very different design than the blue ones, which weren't striped at all.


Monday, October 15, 2007

Lacy Wool Ease Socks from KAL

The Lacy Wool Ease socks. Finished!

This pattern was from a KAL (knit along) on the EasySocks yahoogroup. (an aside here to say what a really, really nice bunch of knitters on that group. I'm on several groups, and this one is really good for beginners with a lot of questions. This group is very helpful and always a pleasure to read. I'm sure that's down to the mods.) The way a KAL works is that your group chooses a pattern and everyone works on that for a certain month. Duh, yeah I know, but I didn't know that before I started this nonsense! lol

Anyway, the pattern was a freebie on the net: http://www.woolworks.org/patterns/linkssox.txt
You know me....I'm always up for the easy way out. I didn't do the pattern on the foot part of the sock. I knew they would be too thick for me, and that my SIL would end up with them for Christmas. I used one of the double stranded colors (not variegated) Wool Ease yarns, and I find out later it's thicker than the single color yarn. I think they turned out pretty nice, though. They do match, I just stuffed one of them with something to show off the "lace" pattern.

Monday, September 17, 2007

Moda Dea Sassy Stripes Socks

More socks! Pairs #4 and 5....I think. :P

These are both made with Moda Dea "Sassy Stripes" yarn. It's soft and the striping is pretty neat, but if you'll look carefully, the two socks in each pair don't really match. Yes, they are all the same dye lot (respectively of course), but one of the blue striped socks has way more yellow, and the colors in the red/pink socks aren't very true either. Naturally the lighting isn't perfect, but you can still get the idea. Another thing that was really weird was that the pink/red yarn is really a lot thinner than the other one. So there was a bit of adjustment on the second pair. I'm not complaining at all. I look at it as a learning experience. I'm sort of tired of hearing people whine about such and such, so I hope I don't come across like that when I describe this yarn.

However, I'm sort of glad I didn't pay for this yarn. Some kind soul gave it to me from her stash. I'm wondering how they will wash. Instructions call for machine wash, and dry flat. That seems odd to me since they are 100% acrylic. I'll probably forget and throw them in the dryer. (note-I've washed and dried them several times and they haven't shrunk or faded.)


But you know, they turned out pretty nice actually. I used bits and pieces of patterns from some leaflets I'd gotten at my yarn shop (sorry, LYS is the proper acronym/jargon), as well as some patterns online. I really like the way the heels turned out. Those heel instructions are from knitty.com and the Ambrosia sock specifically. You know I'd probably better write the pattern down before I forget what I actually did. :P

Oh well, you know, they're free socks and I'll wear them proudly. lol


I've been starting a stash, so not sure what I'll do next. I think I'm very nearly ready for some size 0's and some of that really cool sock yarn I've been fondling.

Now I need to finish the KAL from the EasySocks list. More on that later. ;)

Friday, August 31, 2007

Jiffy Thick and Quick/Red Heart Strata socks

The other socks.....

The first pair shown was made from Jiffy Thick and Quick, using the same pattern as the Sharpe socks. That pattern is easy and using that thick yarn makes them go very quickly. Duh, maybe that's why it's called "Thick and Quick" lol Anyway, these fit even nicer than the worsted weight version, so I'll probably do a bunch of these for my SIL and Mom for Christmas. And who knows, if someone is extra nice to me, he/she might get a pair too!

The second pair is using Red Heart Strata Stripes, which is also worsted weight. I used a different pattern for this pair. This pair will probably go to my SIL or my Mom, because they are a bit big for me. I will use this pattern again, but will do the heels differently and also do some more decreases when I get to the foot part. The heels look a bit funky in the picture, but they aren't quite that weird in "real life."
They haven't been washed yet, but since they are acrylic, they most likely won't shrink or change shape much. But what's so cool is the way the striping works out. I used two separate skeins and fussily started the two at the same point in the yarn pattern, but they really do match quite closely.

The Jayne Cobb hat, Invader Zim style!

The Jayne Cobb hat, Invader Zim style!


A couple of months ago, Nathan and a couple of his friends and I went to see Serenity at a charity screening at Keller 8 theater. The original Jayne Cobb hat is gold, orange and rust, but Nathan wanted something a bit different.
It's a very easy hat pattern. I used Lion Brand Woolease Chunky in Grass, Orchid and Black. You'll need a 16" circular needle, I used size 10 1/2. CO 64 stitches, connect the stitches so you'll be knitting in the round (K every row), be careful not to twist the stitches. Then you'll do K1, P1 ribbing for three rows, then knit in stockinette stitich for about 3 1/2 inches, switch colors, knit in the round (which gives you the stockinette stitch when you knit every row) for about 3 1/2 inches, the start your decreases. K2tog all the way around, twice, until you have 8 stitches. Pull your yarn through the 8 stitches and close up the top. You'll do a 3 inch pompom for the top out of the three colors.
For the ear flaps, count 6 stitches from the back, pm, then count 20, pm, count 12, pm, then 20, pm. You'll be picking up 20 stitiches in black between those markers on either side. Knit in stockinette on straight needles for about 2 1/2 inches, then start your decreases. You'll leave those little dangling ends on the flaps to tie.


The Sharpe Socks

Well okay, since I don't use this one for much, but apparently I use it to comment on other blogs, I'll start using this one for my knitting projects. I hear you saying "woohoo" all the way over here, so just calm down and don't get too excited quite yet.


I've been knitting for nearly 30 years, but sort of got away from it to quilt for a few years. I also took some time off to do thread crochet. (hmmm maybe I need pics of that stuff too sometime) But anyway, I'm back to my needles with a vengeance and have recently fallen in like with doing socks.


Yes it's true what they say, "once you do socks, you never go back." So I have been collecting really cool sock yarns and am on my 4th pair.


I feel that the first pair needs a bit of explanation. I used a pattern from the internet called "mini training sock" and it was only supposed to be small and cute to enable practice on heels and toes, etc. The rest of a sock is pretty straightforward knitting, but heels and toes require a bit more concentration and manipulation of the yarn and needles. Let me tell you, the first time I did a Kitchener stitch toe, I was thinking "wow-this is way cool and it worked!" (simple things for simple minds, eh?


Anyway, I didn't see the sense of using the "good" yarn for a practice piece, so found some variegated/camo Red Heart worsted weight yarn and used that. Well, as I did more and more, I thought I might as well make the sock to fit me. I have small feet so it wasn't that much more knitting. But by golly, they *do* fit and even though they are butt ugly, they are my first pair of socks. The Bean buds call them the Sharpe socks, because they look like they'd match up with Richard Sharpe's Green jacket. ;)


Here they are, for what it's worth.

Friday, April 20, 2007

Mobile bloggin nonsense

Ain't dis purdy?

Ain't mobile bloggin fun? :P

Thursday, March 29, 2007

Fruit-mobile bloggin test

fruit

we are in ohio. round on both ends and high in the middle

Sunday, July 27, 2003

Hey, welcome to my little world on the web. Bloggin? What the heck is that anyway? I guess I'm just sposed to write stuff like a diary or something. Interesting concept.

Okay, thanks for stopping by-I'll try to keep this updated and who knows? Something exciting might happen to me!

Oh yeah, got a new mMode phone the other day-still learning it.

Bye!